Tuesday, December 20, 2022

Crocheted Butterfly Belt

Hello again everyone. Twisted D here again with another free crochet pattern. I got the idea for this pattern from Fiber Spider's (YouTube) butterfly prayer shawl.

US abbreviations & terms are used.

4 or 4.5 mm hook (or hook of choice)
DC = double crochet
SP = space or space's
ST = stitch or stitches 
CH =.chain or chains
FO = fasten off 
YOH = yarn over hook 
Special Stitch: EDC = extended double crochet, YOH, insert hook into indecated st, yoh draw through one loop, yoh draw through two loops, yoh draw through last two loops (you can do a regular dc or triple/treble here instead). The chain two doesn't count as a stitch.

Ch 255 + 2, or amount needed to go around your waist with enough extra to tie . Dc starting in third ch from hook  & across length of your ch, ch 2, turn.

Row 2: *dc 5, ch 5 *, repeat from * to * across, ch 2, turn.

Row 3: Repeat row 2, ch 2, turn.

Row 4: *Dc 5, ch 2, EDC into third st 3 rows below, ch 2*, repeat from * to * across to the end, ch 2, turn.

Row 5: *Dc in each st, 2 dc in the ch 2 sp, 1 at the top of the edc, 2 in ch 2 sp*, repeat from * to * across to the end, fo. 

All done. Hope that you enjoy your new belt. Take care & see you on the flip side.

Twisted D 

Saturday, October 29, 2022

Crochet I Love Lucy Apron

Hello again everyone. TwistedD here again to bring you another free crochet pattern. I created this pattern because I wanted to do a Lucy costume for a Halloween party I was going to attend  I could only find a knitting or sewing pattern. I looked in all the usual spots. So, I decided to create one in a crochet pattern.

Abbreviations & Materials
Ch = chain/chain's
Hdc= half double crochet
Dc = double crochet
Sc = single crochet 
YO = yarn over 
St = stitch/stitches 
Sl st = slip stitch 
FO = fasten off 
Special stitch: hdc puff st; yo hook insert into stitch, pull up a loop, yo go through 2 loops, yo insert hook into same st, pull up a loop, yo & pull through all 4 loops, sl st into next st to finish.
G/4.5 mm hook
Sisores
Stitch Marker/markers
Yarn needle 

White yarn of choice & a small amount of red & black yarn for the accent. I can't tell you exactly how much of either one you will need though because I'm not very good at math. Sorry!

Waistband 
R1. Ch 154 (or amount needed to go around your waist plus extra so that you can tie it). Starting in second ch from hook, hdc across, ch 1, turn (153).
R2. Hdc across, ch 1, turn (153)
R3. This row is going to be a bit tricky. This is your special stitch row. You will start with the white yarn for 1 st, switch to the red before you do the sl st & do the rest of the row in the red yarn until your last sl st, then switch back to the white yarn for the last st, (told you this was going to be a bit tricky), ch 1, turn.
R4. Hdc in first & second st, *ch 1, hdc in sl st spot, ch 1,* repeat from * to *, hdc in last 2 sts, ch 1, turn. (This is what R3& R4 should look like when finished).
R5. Hdc in ch 1 space & hdc st, across, (you should have the same amount of sts that you started with, mine was 153). FO & weave in ends. (After looking at the pictures of the apron yet again. I noticed a black line that ran above & below the red. I did a sl st across both the bottom & top of the waistband).
It should look like this after R5.

Apron shirt
R1. Turn band upside down. You'll be working in the starting chain's. Count over 46 sts (make sure you have the same amount on both sides). Join yarn at the 47 th st & hdc in same st, hdc for 61 sts, ch 1, turn.
R2. Hdc in each st, ch 1, turn (61).
R3-R48. Repeat R2. (61)
R49.. Special st row. This time you will start at the beginning of the row & go to the end, switch back to the white yarn, ch 1, turn.
R50. Repeat row 4 from waistband, ch 1, turn.
R51-53.. 1 hdc in every ch 1 sp & hdc across, fo, weave in the ends. (Don't forget to add the black yarn to the bottom & top of the special stitch row).

Apron points; (the one I kept seeing online had a couple of points at the top). Find the middle of the top, leaving 3 sts empty, go over 7 sts & join yarn, sc in same st & next 2 sts, hdc in next 2 sts, dc in next 2 sts, sl st over the 3 empty sts, dc in next 2 sts, hdc in next 2 sts, sc in 3 sts, fo, weave in the ends.
This is how everything turned out when I was finished. You can find the heart applique on YouTube.

Hope you enjoy your new apron. It can be used as a regular everyday one or as a costume prop. You can make it in any color or colors that you like. Take care & see you on the flip side.

TwistedD 

Thursday, October 27, 2022

Cute & Easy Skirt

Hello again everyone. Twisted D here again with another free crochet pattern.  This skirt is easy to do. Simple crochet terms and stitches are used. I used a multicolored yarn, a 3.5 & 4 mm hook. You will increase 1 dc on each side of the dc v stitch every 5th row.

US crochet abbreviations & terms used.

DC= double crochet

FPdc= front post double crochet
Ch= chain
SC = single crochet (belt only)
Sk st = Skip stitch 
Sp = space
St/sts = stitch or stitches 
Sl st = slip stitch 
YOH = yarn over hook 
Special stitches: double crochet v stitch (2 dc ch 1, 2 dc in same stitch). DC2puffst = double crochet 2 puff stitch (yoh, insert hook into same st, yoh, draw through 2 loops, yoh, insert into same st, yoh, draw through 2, yoh draw through all 3 loops, this is the DC2puffst).
Ch 2 does not count as a stitch 

Belt: ch 221(or amount needed).  Sc in second ch & each ch to last ch, work 3 sc in last st, turn, work 1 sc in each st to last ch, 2 sc in last st, sl st to join. FO. You will work the belt through the DC2puffsts, every 2 st.

Waistband: row 1. ch 180 sl st to join(a cute trick that I learned how to do so that it doesn't twist is, ch 5, hold onto the last ch made, insert hook into first ch, then back into the ch your holding. This should keep it from twisting). Dc around sl st to join.

Row 2. Ch 2, * yoh, insert hook into same st, yoh, draw through 2 loops, yoh, insert into same st, yoh, draw through 2, yoh draw through all 3 loops, (this is the DC2puffst). Ch 1, Sk 1 sp *, DC2puffst around, join with a sl st.
Row 3 & 4: dc in each st & ch 1 sp, sl st to join.
Row 5: ch 2, *DC 3, FPdc around next st, sk I sp,  dc v stitch, sk I sp*, fpdc in next st, repeat from * to *, last st should be a fpdc, sl st to join.
Row 6 - 9: ch 2, *dc 3, fpdc, dc v stitch in ch 1 sp, fpdc, dc 3, fpdc*, repeat from * to *, ending with a fpdc, sl st to join.
Row 10: ch 2, *DC 3, fpdc around next, sk I st dc 1, dc v st in ch 1 sp, dc 1, fpdc*, repeat from * to * ending with a fpdc, sl st to join.
Row 11 - 14. Ch 2, *dc 3, fpdc, sk 2 sts, dc 1, dc v st in ch 1 sp, fpdc *, repeat from * to *, ending with a fpdc, sl st to join.
Row 15: ch 2, *dc 3, fpdc, sk I st,  dc in next 2 sts, dc v st in ch 1 sp, dc 2, sk I st, fpdc*, repeat from * to *, fpdc in last st, sl st to join.
Row 16 - 20: Ch 2, *dc 3, fpdc, sk 2 sts, dc in 3 sts, dc v st in ch 1 sp, dc 3, fpdc*, repeat from *to*, ending with a fpdc, sl st to join.
Row 21: ch 2, *dc 3, fpdc, sk I sp, 1 dc in next 3 sps, dc v st in ch 1 sp, fpdc*, repeat from * to *, ending with a fpdc, sl st to join.

(This is where I changed to the 4 mm hook and started to lengthen how many increases that I did. I wanted it to get longer but not too much wider).

Row 22 - 29: ch 2, *dc 3, fpdc, sk 2 sts, I dc in next 3, dc v st in ch 1 sp, 1 dc in next 3, fpdc*, repeat from * to *, ending with a fpdc, sl st to join.

Row 30: ch 2, *dc 3, fpdc, sk I st, 1 dc in next 4, dc v st in ch 1 sp, 1 dc in next 4, fpdc* repeat from *to*, end with a fpdc, sl st to join.

Row 31 - 40: ch 2, *dc 3, fpdc, sk 2 sts, I dc in next 4, dc v st in ch 1 sp, 1 dc in next 4, fpdc* repeat from *to*, end with a fpdc, sl st to join.

Row 41: ch 2, *dc 3, fpdc, sk 1 st, I dc in next 5 sts, dc v st in ch 1 sp, 1 dc in next 5, fpdc*, repeat from *to*, end with a fpdc, sl st to join.

Row 42 - 50: ch 2,*dc 3, fpdc, sk 2 sts, I dc in next 5 sts, dc v st in ch 1 sp, 1 dc in next 5, fpdc*, repeat from *to*, end with a fpdc, sl st to join. (FO).

You can do more rows if you want it longer or less rows if you want it shorter. I hope you all enjoy making one of these shirts for yourself. Blessed Be Thee & Thin!

TwistedD 

Saturday, August 27, 2022

Rice for two

Hello there everyone. I'm Twisted D. I usually post free crochet patterns but today I'm going to give you a recipe for rice for two. Sorry, but I forget to get a picture when it was done.

Recipe as follows

1/2 cup rice
1 cup broth or water
Salt & Pepper
Herbs such as basil, rosemary or any others you like

Directions:

Heat broth or water in a small saucepan with lid. Then add the rice & herb's of choice. Bring to a boil, then turn down to simmer gently for 10 to 15 minutes. Remove from heat and let sit for another 5 to 10 minutes.
Done. Enjoy!

Monday, July 25, 2022

Crockpot Stuffed Tomatoes For Two

Hello everyone. I'm Twisted D. I usually do posts for free crochet patterns. Today I'm bringing you a recipe. I looked around the web for a recipe for one or two people but didn't find much. So, I came up with my own. I'm a retired cook (once a cook always a cook)! Recipe as follows.

2 large to medium tomatoes
Recipe for rice for two
Shrimp; any kind
Chopped onion (small handful)
Garlic, diced

Directions:

First make the rice and set aside. Next cut off the tops & hollow out your tomatoes; leave about an inch of the bottom and sides of the tomatoes intact, chop your onion, dice the garlic & some of the insides of the tomatoes if you want. Heat a skillet over medium to high heat. Put in the onion & saute for a bit, then add the garlic, add chopped Tomatoes, shrimp & rice Cook until onions are soft and shrimp is cooked. Place the tomatoes in the bottom of your crockpot or slow cooker. Fill with the filling. If you have any filling left over put it around the tomatoes. Add about a cup or two of broth or water. Cover and cook on low for about 4 to 5 hours. Done. Enjoy!

Saturday, July 23, 2022

Air Fryer Breakfast Omelette

Hello everyone, Twisted D here to bring you another recipe. I made this from a leftover stuffed tomato but you can use whatever leftovers that you might have.


Ingredients:
1 ceramic or glass bowl ( large enough to hold everything and fit into air fryer)
2 pieces chopped uncooked bacon
Salt and pepper
Add whatever leftovers you have
2 eggs, whisked with a fork (no milk or water needed unless you want to add them)

Directions:

Preheat the air fryer for 5 minutes at 350. Spray bowl with cooking spray or smear with oil. Whisk eggs and poor into bowl, next add your leftovers, chopped bacon, salt and pepper to desired taste. Place bowl inside your air fryer basket. Bake at 350 for 15 minutes. Check for doneness. If it needs to cook a bit longer. Lower the temperature to 330 and cook for another 10-15 minutes. The bowl will be very hot, so use a potholder to remove it from the air fryer. Let sit for about 5 minutes. Ready to eat and enjoy.

Sunday, February 13, 2022

The Throw Blanket

The Throw Blanket

Hello again everyone. Twisted D here again with another free pattern. I'm not good at determining how much yarn you might need for this pattern. The yarn I used was Alive batik Burcum with fill in's of another yarn. Each skine of Alize yarn, was 100g-3.53oz, 210mt-230 yds., & I had 5 skines. One skine gave me almost 10 complete rows.

American terms used
4.5mm hook(or size hook you want)
Yarn of choice
DC=double crochet
SC=single crochet
CH=chain
ST=stitch/stitches
SK=skip
FO=fasten off
(color combination in the yarn & stitches)

Ok; let's get started:

Row 1: ch 179; *sc in second ch from hook; sk 2, 5 dc in next ch*; repeat from *to*( you should end up with 5dc's in the last stitch). Ch 1, turn.

Row 2: * sc in the middle dc of the 5 dc's, 5 dc in the sc* (repeat from *to*), ch 1, turn.

Row 3: * sc in middle dc, 5 dc in sc* (repeat from *to*), ch 1, turn.

Repeat rows 2 & 3 until your work is as long or wide as you wish. Fasten off and weave in the ends. If you want to, you can add a border. I didn't think it needed one though.

Any questions or comments; please don't hesitate to contact me.  Enjoy!

Butterfly Beachy Cover Up/Dress

Butterfly Dress Tunic 

Hi again, everyone. Twisted D here, bringing you another free crochet pattern. This is designed to go from your shoulders to below your knees. It's worked from side to side or vertically, so you can make it longer, shorter or wider. This is a 8 row repeat. The yarn that I used was OmegaCrys yarn; 40 g balls. Holding 2 strands together. It comes in many different colors/combinations.  You can use whatever lightweight yarn & color you choose. I ended up having to change the kind of yarn I was using because I found out that this yarn has got some kind of metal running through it, which I turned out to be allergic to. Made me itch where it touched my skin. I gave this one too a friend.
(Close look at dress)

US crochet terms used.
4-4.5 mm hook
St = stitch/stitches
DC = double crochet
CH = chain
SP= space/spaces
YO= yarn over
FO = fasten off
FDC = foundation double crochet (only 30 sts).
Special Stitch; EDC= extended double crochet. Yarn over, insert hook into stitch, yo, pull up a loop, yo, go through 1 loop, yo,  go through 2 loops, yo; & go through 2 more loops. (You can do a regular dc or a triple here if you prefer).

Let's get started! 

Back Panel
Set 1
R1. CH 162 + 2; starting in the third ch from hook dc across, ch 2, turn. (CH 2 does not count as a stitch)

R2. DC in 6, *ch 5, sk 5, DC 5*, repeat until you have 6 DC left; stitch across, ch 2, turn.

R3. DC 6, ch 2, EDC in the 3rd stitch from 2 rows down, ch 2, dc 5, ch 2, EDC, repeat to last 6, DC 6, ch 2, turn. (Catch the ch 5 in your first set of loops, this is what gives the butterfly it's body & wings).

R4. *dc in each stitch, 2 dc in each ch 2 space, 1 dc on top of each EDC,* repeat from* to *, ch 2, turn.

Set 2
R5. Repeat row 4 with dc across (these rows are a good place to count the sts if you want to).

R6. DC at bottom of the ch 2 space & next st, *ch 5, skip 5, DC 5* repeat from*to*, dc in last st or 2, Ch 2, turn.

R7. DC at the bottom of the ch 2 & next, *ch 2, EDC, ch 2, dc 5,* repeat from*to*, DC 1 in last 2 st., ch 2, turn.

R8. DC in each stitch across. (162 sts)
(This is what it should look like after the first 2 sets.)

This is where the repeat begins.
Repeat rows 1-8. (Remember that you have 2 rows of dc in between).
( Finished Back Panel).
 Continue to repeat until it's wide enough to cover your back.  Count how many rows you have and divide in half for the front panels if want a front opening. Repeat rows 1-8, until desired width. Last row is a dc row; fo & set aside.
This is 6.5 sets total (13 sets make one panel for me). This is where I would fasten it off at if I wanted a front opening.

Front Panel
Repeat rows 1-6.5.  FDC for 30 stitches, ch 2, turn; (this will give a small v shaped opening in the front). Repeat rows 1-6.5, ending with a dc row. Fasten off.
Sew side seems together leaving an opening large enough for your arm's to go through & leave about 30 stitches undone for a small slit on the side at the bottom. Sew shoulder seems up to the the last 4 rows before the v opening. Repeat for other side.

Optional Boarder:

Join yarn at a side. Hdc evenly across bottom, 3 HDC on corner's & up into slit, on both sides, fo. Neck opening; start at center back & sc around, place 3 sc in corner, at bottom of the v sc2tog, then continue sc to end, sl st to join, fo.

If desired; create a chain long enough to go around you that you can tie. Starting in second ch sc across, fo.

Finished. Question's,  comments & pictures are greatly appreciated. Blessed Be! I don't usually have anyone to help take pictures. So, I take my own, selfie's.

TwistedD


Wednesday, February 9, 2022

Plant Pot Cover or Cozy

Hi again everyone. TwistedD here again with another free crochet pattern. Quit simply named.

Abbviations:
DC - double crochet
MR - magic ring
SC - single crochet
BLO - back loops only
Ch - chain
Sl St - slip stitch
St/sts - stitch or stitches
This is done in the round until about round 3 of the part that goes around the pot itself.

Materials:
5 mm hook or hook of choice. DK yarn, color or colors of choice. If you want to use a thinner yarn go down in hook size.

Lets begin!

R 1. 6 sc in mr, pull tight
R 2. 2 sc in each stitch around (12)
R 3. *1 sc, 2 sc*:in next, repeat from * to * (18)
R 4. 1 sc in next 2 st, 2 sc in next, repeat around (24)
R 5. 1 sc in the next 3 sts, 2 sc in next, repeat around (30)
R 6. 1 sc in the next 4 sts, 2 sc in the next, repeat around (36)
R 7. 1 sc in the next 5 sts, 2 sc in the next, repeat around (42)
R 8. 1 sc in the next 6 sts, 2 sc in the next, repeat around (48)
R 9. 1 sc in the next 7 sts, 2 sc in the next, repeat around (54)
R 10. 1 sc in the next 8 sts, 2 sc in the next, repeat around (60)
R 11. 1 sc in the next 9 sts, 2 sc in the next, repeat around (66)
R 12. 1 sc in the blo around (66)
R 13-15 sc in each stitch around (66)
R 16. *1 sc, sk 2, 5 dc in next*, repeat around, sl st to join, ch 1, turn work.
R 17. *1 sc on top of the 3rd dc, 5 dc in the sc*, repeat around, sl st to join, ch 1, turn
(It should look something like this)
Continue in this manner until the cover is as tall as you need or want it. Fasten off & weave in the ends. 
Finished!!

Enjoy!!


Saturday, January 22, 2022

Large Hanging Sloth Pot Holder

TwistedD here again to bring you another free crochet pattern. Been seeing a lot of these online lately. Worked one up that I found on YouTube done with a 3.5 mm hook. I used a 4.5 mm and it still turned out somewhat small. So, I'm trying to make one quite a bit bigger.

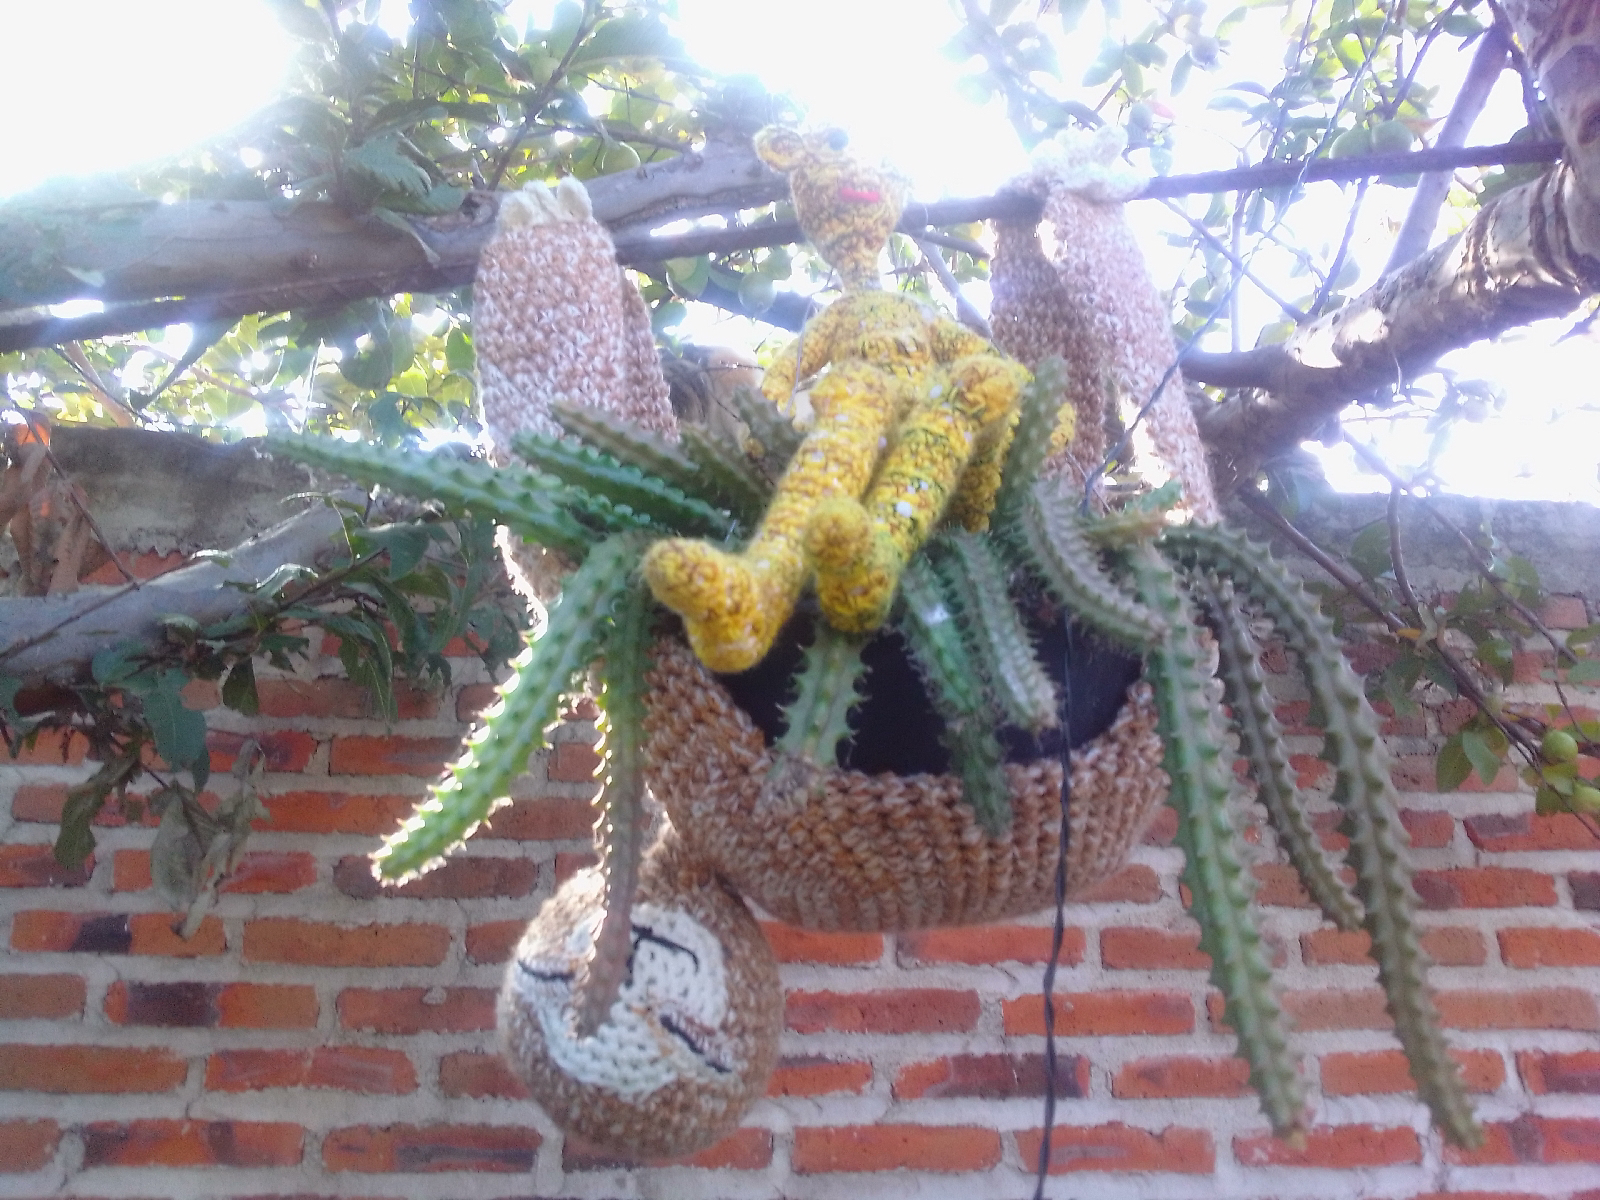
(Finished! Hanging from repar with a fairy setting on top)
Abbviations & Materials
MR - magic ring
Sc - single crochet
DC - double crochet
BLO - back loop only
Tre- treble (for claw's/toes)
St/sts - stitch/stitches
Sk/skd- skip/skipped
Sl st- slip stitch
Inc - increase
Dec- decrease
Ch - chain
FO - fasten off
Special stitch: twisted V; sk 1 st, DC in next, ch 1,  go back & dc in st skd. Repeat to end. (For plant holder only).

DK worsted yarn, color or colors of choice, I held 3 different colors together, 4.5 mm hook for eyes & claw's or toes only, 7 mm hook, stitch marker & toy stuffing. Let's get started.

Head & Body

1. MR 6 sc (6)
2. 2 sc in each stitch (12)
3. 1 sc, Inc x 6 (18)
4. 2 sc, Inc x 6 (24)
5. 3 sc, Inc x 6 (30)
6. 4 sc, inc x 6 (36)
7. 5 sc, inc x 6 (42)
8-12 sc in each stitch for 5 rounds (42)
13. 5 sc, dec x 6 (36)
14. 4 sc, dec x 6 (30)
15. 3 sc, dec x 6 (24)
16. 2 sc, dec x 6 (18)
17. 1 sc, dec x 6 (12)
18. Dec around (6)
(Head & beginning of body)

19. 2 sc in each stitch (12)
20. 1 sc, inc x 6 (18)
21. 2 sc, inc x 6 (24)
22. 3 sc, inc x 6 (30)
23. 3 sc, inc x 6 (36)
24. 4 sc, inc x 6 (42)
25. 6 sc, inc x 6 (48)
26. 7 sc, inc x 6 (54)
27. 8 sc, inc x 6 (60)
28-42. 1 sc in each stitch for 13 rounds.
43. 8 sc, dec x 6 (54)
44. 7 sc, dec x 6 (48)
45. 6 sc, dec x 6 (42)
46. 5 sc, dec x 6 (36)
47. 4 sc, dec x 6 (30)
48. 3 sc, dec x 6 (24)
49. 2 sc, dec x 6 (18)
50. 1 sc, dec x 6 (12)
51. Dec around (6). Fo and weave in the ends.
(Head & Body finished)

Arms make 2
1.6 sc in Mr (6)
2. 2 sc in each stitch (12)
3.6 sc, inc x 2 (16)
4. 4-35, sc in each stitch around. Fo at the end of 35; leave a long tail for sewing.

(Arm/arms)

Legs; make 2
Follow for the arms to round 35 & fo, leaving a long tail for sewing.


Claw's or Toes (optional)
At top of the arm's & legs place 3 claw's or toes as they are called. Start on the far right side. Join White yarn with a sl st, ch 4, rap yarn around hook twice, insert into same st you started in bring up a loop, yo hook & pull through 2 loops, yo pull through 2 loops, you'll have 2 loops on the hook, repeat 1 more time, then yo & pull through all 3 loops, ch 3 & sl st in same st. Sl st to next st & repeat st, sl st to next st & repeat; fo & weave in the ends. The claw's or toes are showen in the pictures of the arm's & leg's.  Where you see the pen is where I would sew them together at.

Face Patch
1. 6 sc in MR (6)
2. 2 sc in each stitch (12)
3. 1 sc, Inc x 6 (18)
4. 2 sc, inc x 6 (24)
5. Sc in each stitch around, fo & weave in the ends. Leave long tail for sewing & sew to the side of the head.
(Face Patch)

Eyes: make 2 (4.5 mm hook)
Ch 8, 2 sc in second st from hook, 1 sc in the next 5 sts, 5 sc in last st. Turn to other side of ch & place 1 sc in next 5 sts, 1 sc in last & fo. Leave a long tail for sewing. Run a piece of black yarn through center for the iris.
(Eyes)

Plant Holder

6 sc in MR (6)
2 sc in each stitch (12)
1 sc, Inc x 6 (18)
2 sc, Inc x 6 (24)
3 sc, inc x 6 (30)
4 sc, inc x 6 (36)
5 sc, inc x 6 (42)
6 sc, Inc x 6 (48)
7 sc, inc x 6 (54)
8 sc, inc x 6 (60)
11. Blo in each stitch around (60)
12 -15. Sc in each stitch for 3 rounds, ch 1 at the end of 15. (60)
16. Sk 1 st, dc in next st, go back & place a dc in st skd. Repeat to end of round.
17. Sc in each stitch  (60)
18. Sc 8, dec x 6 (54) I did this to help bring the holder in just a little & So it wouldn't be so floopy.
19. Sc in each stitch (54)
20. Repeat round 16
21-24. Sc in each stitch for 3 rounds, (60)
25. Sl st around top, fo and weave in the ends. Sew to the belly of the Sloth at the sides & bottom or leave loose to use separately.
(Plant holder with & without the sloth)

You can make the plant holder taller & wider if you wish.

Assembly:

Sew arms & legs to side of sloth at the top & bottom. Where you place the arms & legs are up to you. Sew plant holder to sloth if desired. (See picture below for reference only).

Finished!! Any comments or questions.  Please don't hesitate to ask.
TwistedD signing off for now!


TwistedD's Sauce

Hello again everyone. Twisted D here again to bring you another recipe that you just might like. It's pretty easy & simple to make. ...