Sunday, February 13, 2022

The Throw Blanket

The Throw Blanket

Hello again everyone. Twisted D here again with another free pattern. I'm not good at determining how much yarn you might need for this pattern. The yarn I used was Alive batik Burcum with fill in's of another yarn. Each skine of Alize yarn, was 100g-3.53oz, 210mt-230 yds., & I had 5 skines. One skine gave me almost 10 complete rows.

American terms used
4.5mm hook(or size hook you want)
Yarn of choice
DC=double crochet
SC=single crochet
CH=chain
ST=stitch/stitches
SK=skip
FO=fasten off
(color combination in the yarn & stitches)

Ok; let's get started:

Row 1: ch 179; *sc in second ch from hook; sk 2, 5 dc in next ch*; repeat from *to*( you should end up with 5dc's in the last stitch). Ch 1, turn.

Row 2: * sc in the middle dc of the 5 dc's, 5 dc in the sc* (repeat from *to*), ch 1, turn.

Row 3: * sc in middle dc, 5 dc in sc* (repeat from *to*), ch 1, turn.

Repeat rows 2 & 3 until your work is as long or wide as you wish. Fasten off and weave in the ends. If you want to, you can add a border. I didn't think it needed one though.

Any questions or comments; please don't hesitate to contact me.  Enjoy!

Wednesday, February 9, 2022

Plant Pot Cover or Cozy

Hi again everyone. TwistedD here again with another free crochet pattern. Quit simply named.

Abbviations:
DC - double crochet
MR - magic ring
SC - single crochet
BLO - back loops only
Ch - chain
Sl St - slip stitch
St/sts - stitch or stitches
This is done in the round until about round 3 of the part that goes around the pot itself.

Materials:
5 mm hook or hook of choice. DK yarn, color or colors of choice. If you want to use a thinner yarn go down in hook size.

Lets begin!

R 1. 6 sc in mr, pull tight
R 2. 2 sc in each stitch around (12)
R 3. *1 sc, 2 sc*:in next, repeat from * to * (18)
R 4. 1 sc in next 2 st, 2 sc in next, repeat around (24)
R 5. 1 sc in the next 3 sts, 2 sc in next, repeat around (30)
R 6. 1 sc in the next 4 sts, 2 sc in the next, repeat around (36)
R 7. 1 sc in the next 5 sts, 2 sc in the next, repeat around (42)
R 8. 1 sc in the next 6 sts, 2 sc in the next, repeat around (48)
R 9. 1 sc in the next 7 sts, 2 sc in the next, repeat around (54)
R 10. 1 sc in the next 8 sts, 2 sc in the next, repeat around (60)
R 11. 1 sc in the next 9 sts, 2 sc in the next, repeat around (66)
R 12. 1 sc in the blo around (66)
R 13-15 sc in each stitch around (66)
R 16. *1 sc, sk 2, 5 dc in next*, repeat around, sl st to join, ch 1, turn work.
R 17. *1 sc on top of the 3rd dc, 5 dc in the sc*, repeat around, sl st to join, ch 1, turn
(It should look something like this)
Continue in this manner until the cover is as tall as you need or want it. Fasten off & weave in the ends. 
Finished!!

Enjoy!!


Saturday, January 22, 2022

Large Hanging Sloth Pot Holder

TwistedD here again to bring you another free crochet pattern. Been seeing a lot of these online lately. Worked one up that I found on YouTube done with a 3.5 mm hook. I used a 4.5 mm and it still turned out somewhat small. So, I'm trying to make one quite a bit bigger.

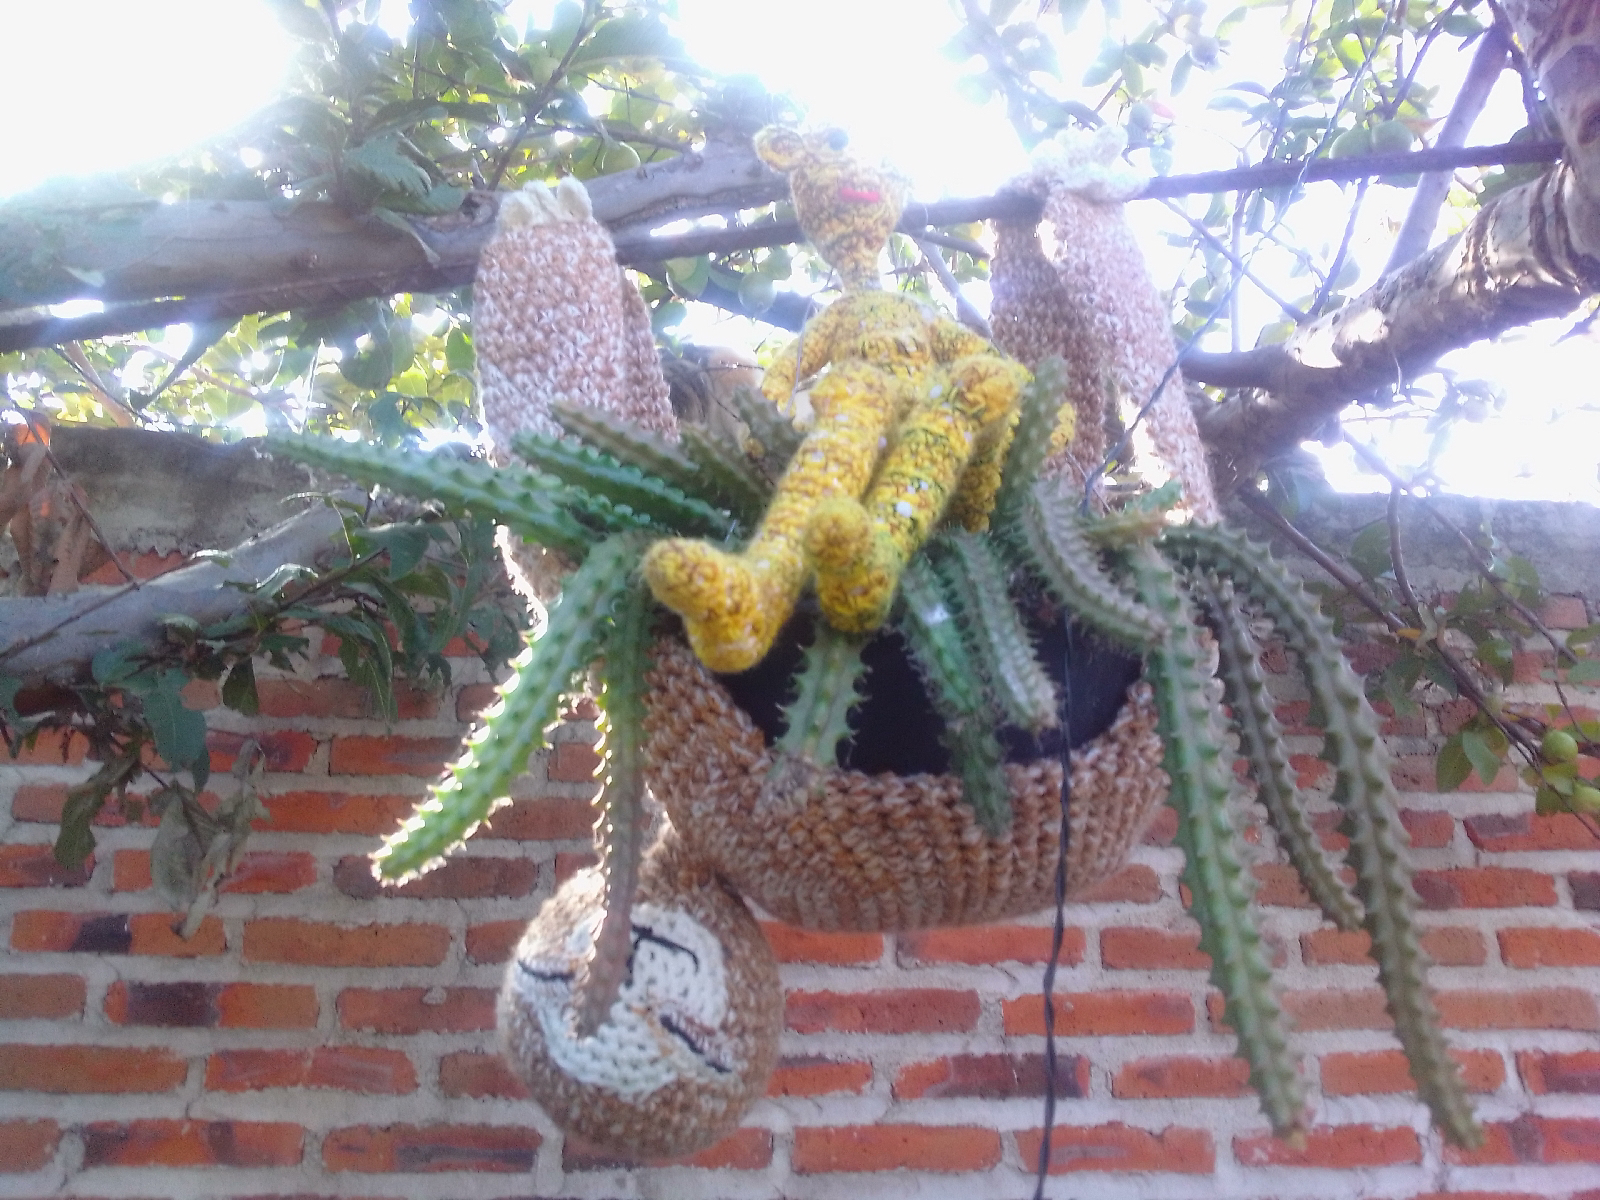
(Finished! Hanging from repar with a fairy setting on top)
Abbviations & Materials
MR - magic ring
Sc - single crochet
DC - double crochet
BLO - back loop only
Tre- treble (for claw's/toes)
St/sts - stitch/stitches
Sk/skd- skip/skipped
Sl st- slip stitch
Inc - increase
Dec- decrease
Ch - chain
FO - fasten off
Special stitch: twisted V; sk 1 st, DC in next, ch 1,  go back & dc in st skd. Repeat to end. (For plant holder only).

DK worsted yarn, color or colors of choice, I held 3 different colors together, 4.5 mm hook for eyes & claw's or toes only, 7 mm hook, stitch marker & toy stuffing. Let's get started.

Head & Body

1. MR 6 sc (6)
2. 2 sc in each stitch (12)
3. 1 sc, Inc x 6 (18)
4. 2 sc, Inc x 6 (24)
5. 3 sc, Inc x 6 (30)
6. 4 sc, inc x 6 (36)
7. 5 sc, inc x 6 (42)
8-12 sc in each stitch for 5 rounds (42)
13. 5 sc, dec x 6 (36)
14. 4 sc, dec x 6 (30)
15. 3 sc, dec x 6 (24)
16. 2 sc, dec x 6 (18)
17. 1 sc, dec x 6 (12)
18. Dec around (6)
(Head & beginning of body)

19. 2 sc in each stitch (12)
20. 1 sc, inc x 6 (18)
21. 2 sc, inc x 6 (24)
22. 3 sc, inc x 6 (30)
23. 3 sc, inc x 6 (36)
24. 4 sc, inc x 6 (42)
25. 6 sc, inc x 6 (48)
26. 7 sc, inc x 6 (54)
27. 8 sc, inc x 6 (60)
28-42. 1 sc in each stitch for 13 rounds.
43. 8 sc, dec x 6 (54)
44. 7 sc, dec x 6 (48)
45. 6 sc, dec x 6 (42)
46. 5 sc, dec x 6 (36)
47. 4 sc, dec x 6 (30)
48. 3 sc, dec x 6 (24)
49. 2 sc, dec x 6 (18)
50. 1 sc, dec x 6 (12)
51. Dec around (6). Fo and weave in the ends.
(Head & Body finished)

Arms make 2
1.6 sc in Mr (6)
2. 2 sc in each stitch (12)
3.6 sc, inc x 2 (16)
4. 4-35, sc in each stitch around. Fo at the end of 35; leave a long tail for sewing.

(Arm/arms)

Legs; make 2
Follow for the arms to round 35 & fo, leaving a long tail for sewing.


Claw's or Toes (optional)
At top of the arm's & legs place 3 claw's or toes as they are called. Start on the far right side. Join White yarn with a sl st, ch 4, rap yarn around hook twice, insert into same st you started in bring up a loop, yo hook & pull through 2 loops, yo pull through 2 loops, you'll have 2 loops on the hook, repeat 1 more time, then yo & pull through all 3 loops, ch 3 & sl st in same st. Sl st to next st & repeat st, sl st to next st & repeat; fo & weave in the ends. The claw's or toes are showen in the pictures of the arm's & leg's.  Where you see the pen is where I would sew them together at.

Face Patch
1. 6 sc in MR (6)
2. 2 sc in each stitch (12)
3. 1 sc, Inc x 6 (18)
4. 2 sc, inc x 6 (24)
5. Sc in each stitch around, fo & weave in the ends. Leave long tail for sewing & sew to the side of the head.
(Face Patch)

Eyes: make 2 (4.5 mm hook)
Ch 8, 2 sc in second st from hook, 1 sc in the next 5 sts, 5 sc in last st. Turn to other side of ch & place 1 sc in next 5 sts, 1 sc in last & fo. Leave a long tail for sewing. Run a piece of black yarn through center for the iris.
(Eyes)

Plant Holder

6 sc in MR (6)
2 sc in each stitch (12)
1 sc, Inc x 6 (18)
2 sc, Inc x 6 (24)
3 sc, inc x 6 (30)
4 sc, inc x 6 (36)
5 sc, inc x 6 (42)
6 sc, Inc x 6 (48)
7 sc, inc x 6 (54)
8 sc, inc x 6 (60)
11. Blo in each stitch around (60)
12 -15. Sc in each stitch for 3 rounds, ch 1 at the end of 15. (60)
16. Sk 1 st, dc in next st, go back & place a dc in st skd. Repeat to end of round.
17. Sc in each stitch  (60)
18. Sc 8, dec x 6 (54) I did this to help bring the holder in just a little & So it wouldn't be so floopy.
19. Sc in each stitch (54)
20. Repeat round 16
21-24. Sc in each stitch for 3 rounds, (60)
25. Sl st around top, fo and weave in the ends. Sew to the belly of the Sloth at the sides & bottom or leave loose to use separately.
(Plant holder with & without the sloth)

You can make the plant holder taller & wider if you wish.

Assembly:

Sew arms & legs to side of sloth at the top & bottom. Where you place the arms & legs are up to you. Sew plant holder to sloth if desired. (See picture below for reference only).

Finished!! Any comments or questions.  Please don't hesitate to ask.
TwistedD signing off for now!


Monday, September 6, 2021

Crochet Swinging Fairy Chair Revised

Even though I like the original pattern. I just had to see if I could go it just a little better & bigger. So; here you go. The New swinging chair designed for small doll's, fairies & such.
American terms are used.
Abbreviations & Materials required.
3.5-4mm hook
SC = single crochet
Ch = chain/chains
BLO = back loop only
F/O = fasten off
Sl st= slip stitch
Special stitch
Sc2tog picot stitch; sc2tog, ch 5, sl st into top of the stitch (you will have 1stitch left at the end, f/o there).
(Fairy setting in her chair)

Row 1: ch 16, in second stitch from hook sc & in each st across, ch 1, turn (15).
Row 2-13: sc across, ch 1, turn. (15)
Row 14: blo sc across, ch 1, turn. (15)
Row 15-28: sc across, ch 1, turn.
Row 29: sc2tog picot stitch across, f/o. (7)

About half way down the edge of the back of the chair you will attach your yarn with a sl st, ch 19, sl st into corner, turn & sl st back to the start, sl st then f/o. Do the same for the other side.  These are the arms of the chair.
Attach yarn at one of the top corners of the chair with a sl st. Ch 45, f/o. Do the same thing on the other corner. 
Attach yarn at about 5-6 stitches up from where you attached the chian of 19 to. Sl st to join, ch up 55, f/o. Do the same thing on the other side. Tie all chains together at the top. Hang from wherever you'd like to see it at. 

Hope you all like my crochet Swinging Fairy Chair. Any questions; please don't hesitate to ask. Pictures would be awesome! Blessed Be!


Crochet Swinging Fairy Chair

Hello again everyone. I created this little swinging chair for a bunch of fairies that I made and wanted to put out into my backyard & keep high enough so that the dogs couldn't get to them. I don't have a lot of trees; so, I came up with the idea of a swing they could sit in that I could hang from what branches I do have.

Abbreviations & Materials
SC,= single crochet
St = stitch
CH = chain/chains
F/O= fasten off
Sl St =slip stitch
BLO= back loop only
Sc2tog = single crochet 2 together
3.5-4mm hook (or size desired).
You can make this as small or large as needed. Any color or type of yarn.
Ch 16, sc in second stitch from hook & each st across, ch 1,  turn (15).
Row 1-9(more for a wider seat).
Row 10: sc across in blo, ch 1, turn.
Row 11-21 sc across, ch 1, turn.
Row 22: *sc2tog, ch 4, sl st into top of st*, repeat from *to*, f/o.
This creates a little picot design on top of the chair.

About half way down on the back side, join yarn & ch 8, (or number needed), sl st into bottom corner of seat, ch 1, turn, sc back across & f/o. Do this for both sides. This gives you a bit of an arm rest kind of thing.

Depending on how long you want the chain's that it will hang by will depend on how many chains to make. For my first one, I only chained 25 for the top back & 35 for the bottom & crochet together at the top to make one loop.

Hope you like my little swinging chair. Any questions; please don't hesitate to ask. Would love to see some pictures!

Sunday, August 8, 2021

Boho Belt


Hola everyone! Back again with another free pattern. I'm calling it the boho belt. Will provide pictures as I go along. This is similar to another pattern online but you will see the difference in the two patterns.
I used a 4mm hook. You can use whatever hook & yarn you like.

US Terms used:
Ch=chain or chains
Sp=space or spaces
DC=double crochet
SC=single crochet
Sk=skip
Sl st,=slip stitch
Special stitch; dc picot. DC ch 4, sl st into top of the dc.

Sizes are small with medium- xxlarge in brackets. IE: sm(med, LG, XL, XXL, etc).
Chain; 146,(175,182, 196, 212).

Row 1: * sc in second ch from hook, ch 5, sk 3, sc*, (you'll be working the other side of the chain the same), Slst into next 2, ch 1, sc into same sp, ch 5, sc* repeat from*to* ending in a sc.
(This is what it should look like at the end of row 1).

Row 2: ch 1, *sc in same sp, ch 1, dc picot 7 times, ch 1 sc in next ch 5, ch 1*; repeat from*to* (remember your going to be doing the same thing on the other side). Fasten off. Weave in the ends.
hi

Monday, April 12, 2021

Windsock

Hello again everyone. This time I have for you a windsock crochet pattern. 
Materials needed; 1 round hoop. 1 5mm hook, 4 stitch markers.  The hoop can be made of plastic, wire or wood. The bigger the circle the more stitches you will need. Any kind of yarn can be used for this. The lighter the yarn the more flowing it will be.

This is what mine looked like at the beginning. I have about 134 stitches on the circle.
Abbreviations:
SC= single crochet
DC= double crochet
CH= chain
DEC= decrease
ST= stitch/stitches
Sl St= slip stitch
PM= place marker

This is done in the round. CH 1 or 2 do not count as a stitch. 
CH 1, with hook wrap the yarn around the circle to create a sc. Do this all the way around. Do not join. PM here and move marker up every 2 rows.  Continue doing sc in each stitch for about 10 rounds or rows, (longer if you want). This is where you will start your decreases. Divide total number of stitches by 4.  Place a stitch marker in those spots. This is where the Dec will be placed or close. You want the piece to end with about 50 rounds or rows & end with about about 20 stitches total, fasten off. 

At the beginning or top. Find your halfway point then half again. Place a marker in those spots. Tie yarn to one spot & sc 38 chains, turn sc 37 back at last stitch get your hook around the circle and make a sl St & sc back up 37, f/o, leave about a 3 inch tail. Repeat for your remaining spots. When done with all 4 pieces; tie them together and cut off excess.


It should look something like this. Finished!

NOTE:  If you want to put a design onto the thing that is fine. Just remember to adjust the stitches as you go down to the narrowist point, so it doesn't get too wonkie.


Freah Tomatoe Soup for One or Two

Hello Everyone  This time it's a recipe and not a new crochet pattern. Fresh Tomato Soup  Two large size tomatoes, cubed (be...